I’ve been riding my Brompton for over 18 months and with my average Brompton ride being approximately 8 miles, I’ve been looking into replacing the standard foam grips for something that will ease the discomfort on my palms. Having researched various different options I decided to go with a pair of leather grips from Temple Cycles.
Temple Cycles are a niche producer of bespoke and traditional steel framed bicycles, each one is built to order and all have that classic retro look. In addition to the bikes they have a range of accessories that complement that classic look, the Lock-On Ergo Grips are part of their leather collection.
The grips are made from an acrylic sleeve wrapped in Italian leather, which is lovely and soft to the touch, aluminium bar ends, alloy locking clamps and stitched seams. The are available in two colours Honey (a light tan) and Chestnut (a dark brown), as you can see I went for the Chestnut.
The hardest part of fitting the grips to the Brompton was removing the standard grips. I was hoping to remove them without damaging them, but the glue was too strong and I had to resort to cutting them off.
With the foam grips removed and the glue cleaned up, it was a case of sliding the new grips onto the bar, it was a little tight, but with a twisting and pushing motion the grips slid on. I needed to move the right hand brake lever about 5mm towards the centre of the bar to make enough room for the grip to fully fit. Once on and in position you just need to tighten two allen screws on each grip, you will need a 3mm and 4mm allen key. The locking mechanism is simple, but very effective, the grips don’t slip or slide around at all.
The extra width of the Ergo grip provides that much needed support for the palm of my hand, which has increased the comfort levels dramatically for me. Previously I would nearly always wear padded gloves to ride the Brompton over longer distances, now I just love the feel of that soft leather. In fact, it makes me want to ride the Brompton more than ever.
If you are looking at replacing your standard Brompton grips or any other set of grips/bike for that matter, I can recommend these grips for style, quality, ease of fitting and more importantly comfort. So far, the only thing I can find to fault them on is that I would have preferred the 3mm allen screw the other way up, so that I could see the screw head rather than a small hole, but that is purely down to aesthetics and a mild case of OCD on my part!
The leather and design really suits the Brompton, I especially like the stitching and it seems right to install a British made grip (albeit Italian leather) on a British classic bicycle. I just need that matching Brooks saddle….
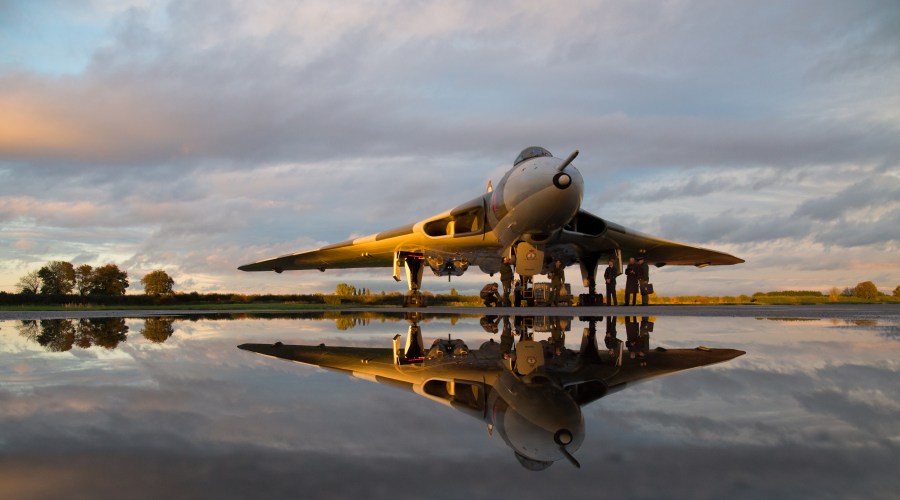
The delta winged Avro Vulcan, the UK’s once nuclear bomber, will take it’s last flight in October 2015. When the last airworthy Vulcan, XH558, lands at Robin Hood Airport in Doncaster for the final time it will truly be the end of an era for British aviation.
Whilst we will never again hear the famous Vulcan howl as it roars overhead, wowing the crowds with its graceful moves, it is still possible to get close to these impressive bombers. XH558 will be kept in active ground running order, carrying out fast taxi runs at Robin Hood Airport and while another Vulcan, XM655, has been pulling in the crowds since 1997 with her annual fast taxi runs at Wellesbourne Mountford airfield in Warwickshire.
Avro Vulcan XM655 at Wellesbourne Mountford, Warwickshire, UK
Vulcan XM655 is cared for by the 655 Maintenance and Preservation Society (MaPS) and is the youngest surviving Vulcan of the 136 that were produced, being the third but last off the production line in 1964. She retired from active service in 1984 and landed at Wellesbourne later that year. She remained untouched until the late 1990’s when 655 MaPs was formed with the aim of returning her to active ground running.
The volunteers of 655 MaPs give up most of their Saturdays to maintaining and preserving her for future generations and keeping her active for as long as possible, many of these volunteers are ex-RAF personnel who served on Vulcans.
XM655 is open to visitors on Saturdays between 10am and 4pm where you can take a look around the aircraft, take photos and even get a tour of the cockpit for a small donation. Cockpit tours are free for members of XM655MaPs on production of their membership card. Annual membership, at the time of writing, is £15 – more details are available on the XM655 website.
Another way of getting up close to the most powerful surviving Vulcan bomber at Wellesbourne is through special events. I attended one of these events on Saturday, organised by TimeLine Events and facilitated by 655MaPs, making the aircraft available for an afternoon and late evening photoshoot. All of the photos in this post were taken by me during this one photoshoot.
The weather forecast for Saturday afternoon was heavy rain, although it would hopefully be drying up during the evening. I arrived at Wellesbourne at 3pm with full wet weather gear, camera (including a new rain cover) and a tripod. The rain was hitting the windscreen and the cars wipers were on full, I pulled onto the airfield at Loxley Lane close to XM655’s hard standing area and onto a grass area set aside of parking, hoping that the rain would stop so that we would stand a chance of getting all the cars off the field.
It was a wet dreary autumnal October day, nevertheless the volunteers of 655MaPs had been working hard throughout the morning and in the rain preparing the aircraft and the site just for a group of people to take some photos. Not forgetting the hog roast stand from Food Yule Love selling the all important cups of coffee (and tea), jacket potatoes, pulled pork rolls complete with stuffing and apple sauce.
Wellesbourne is an active airfield and they had agreed to close the taxi way from the main runway in front of the hard standing. The Vulcan had been moved onto the taxi way, with towing arm, genuine tug along with the ground power/generator.
XM655 on the main taxi way at Wellesbourne Mountford
Following a safety briefing, an outline of the days events and with the rain easing off we set about taking our photographs.
XM655 service and access equipment was on hand to get different vantage points.
Just as I made to the top of the access stairs viewing platform the sun broke through the clouds and made an appearance, allowing me to capture the aircraft in a late afternoon golden light with the oranges, yellows and reds of autumn foliage as the backdrop.
A group of re-enactors, dressed in period clothing were on hand to make the scenes that little bit more authentic, replicating the 1960’s/70’s when the Avro Vulcan was a nuclear deterrent and maintained in a readiness state known as Quick Reaction Alert (QRA)
With the sun setting behind us the clouds started to break leaving a lovely clear sky as the new backdrop, Neil Cave and his team from TimeLine Events setup the lights illuminating XM655 from various angles.
Towards the end of the evening, XM655’s Auxiliary Power Unit (APU) was fired up and her navigation, anti-collision and landing lights were switched on for that unique photo opportunity, giving the impression that XM655 was again on Quick Reaction Alert and at any moment she would taxi off to the runway and off into the night skies….
Even with the rain it was an excellent day, in fact without the rain I wouldn’t have taken my best photo of the day, XM655 in the evening sun with it’s reflection in the standing water (first photo in this post). The only negative thing I can say about the whole experience was that there seemed to be too much emphasis on setting the scene with the re-enactors, whilst they do make the scene, I would have preferred the opportunity to take more shots of just the aircraft.
I would recommend this type of photoshoot/event to anyone interested in aviation photography.
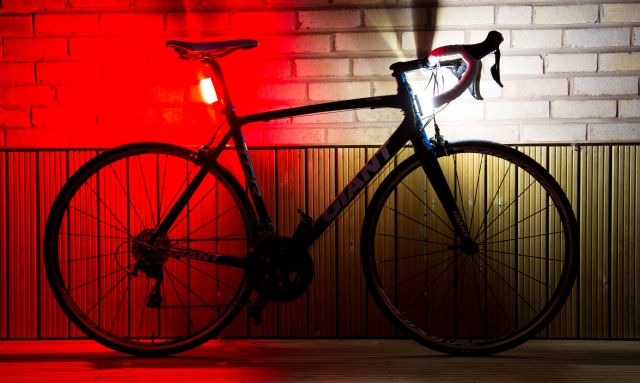
Orfos Flares are some of the brightest bike lights I’ve owned, if you want to be visible whilst riding in the dark these are the lights for you.
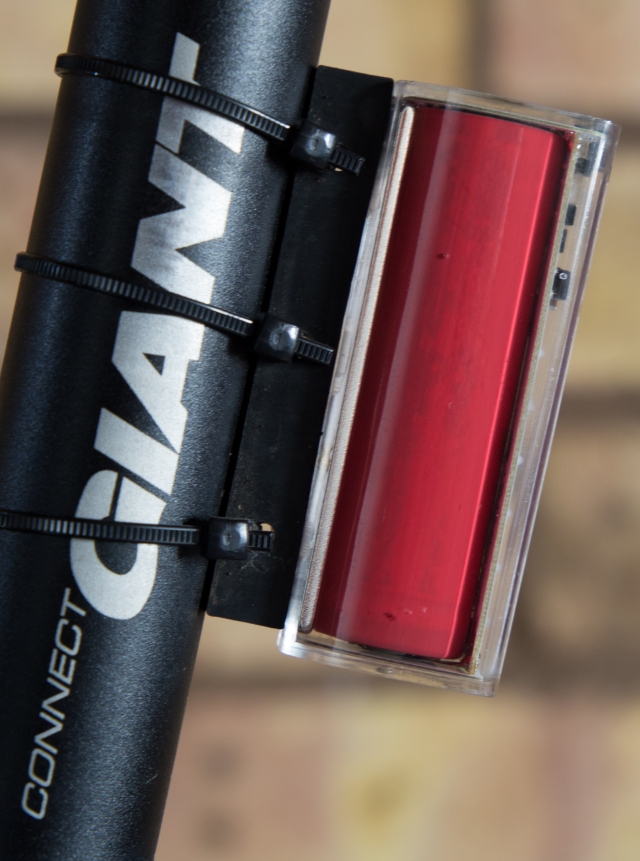
They are made up of half watt Light Emitting Diodes (LEDs) encased in a clear reflective fully waterproof housing providing 360 degrees visibility. It has a single press button that controls the three functions (On/Off, Mode Selection and Brightness).
Orfos Flares – 360 Degrees Visibility
Specifications: –
Modes – Solid, Pulse, Flash and Strobe
Size – 73.5mm x 23.5mm x 28.5mm
Lumens* – Red 500 / White 300
Rechargeable – Yes, via Micro USB (cable supplied)
Battery Life – 24 hours on LOW / 90 Minutes on FULL
Mounting System – Magnet and Cable Ties
Weight** – Red 86g / White 81g / Magnet (mount) 107g
Waterproof – Yes 100%
Price – $119 each or $229 for a pair with 4 mounts
I initially saw these flares on KickStarter and immediately backed the project, my pair of flares were some of the first to arrive in Europe in March 2015, so I’ve been using them for the last six months now.
Orfos Flare
The mounting system is simple and fuss free, it’s essentially an extremely strong magnet attached to the bike with three cable ties. This system means there’s no more fumbling with clips and brackets to release the lights especially in gloved hands and is brilliant for transferring the lights between bikes.
Magnetic mounting system.
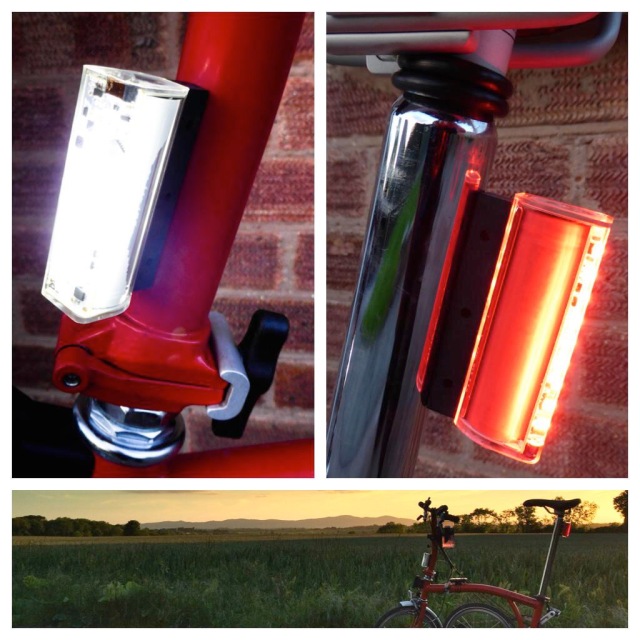
For steel frames there is no need to use the cable ties, I’ve found this to be extremely useful on my Brompton, the entire mount is removable so it does not impede the folding process like most other mounting systems.
Mounting on a Brompton (steel frame) without the cable ties
They need to be mounted vertically as this ensures the best magnetic holding strength, in the horizontal position the mounts are very susceptible to impact shocks and the flare can easily become detached. When mounted vertically this will not be an issue for you, I’ve fitted them to my mountain bike and rode a few local trails with jumps and they didn’t move at all.
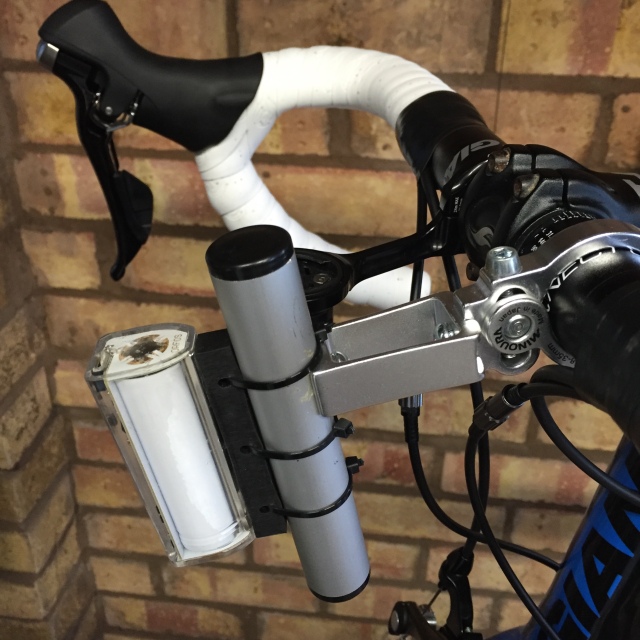
However, it does restrict where you can mount the flares. The manual does not specify a preferred mounting position, although with the vertical mounting requirement the only real feasible position for the front flare is the head tube. Like most bikes my head tube isn’t perpendicular to the ground and leans back at an angle of 74 degrees. This results in the flare being angled up too much and even on the low setting I’ve had several cars flash me, this means they can definitely see me but I am probably dazzling them.
There needs to be some way of dipping the beam as without it I’m reluctant to ride dazzling on coming traffic. My current solution is to use a cheap bar extender rotated through ninety degrees, I don’t like the look of it but it works. I’m thinking of gluing a Go Pro mount to the top of the magnet so that I can attach it to a K-Edge handle bar mount instead. I’ll post a follow-up if I do this! It would be good if Orfos could look into some form of official bar mount as an optional accessory.
The single button makes them very easy to use, the first press turns them on, subsequent quick presses cycle through the modes (Solid, Pulse, Flash and Strobe) pressing for half a second cycles through the brightness settings (Low, Medium and High) and to turn off you press and hold for three seconds.
Although, a disadvantage of this single button process is that I have found that I often end up changing modes by accident when trying to lower the brightness settings, which can be a little frustrating at times as you have to cycle through them to get back to the mode you want.
Recharging is as simple as connecting the supplied Micro USB cable to any powered USB port, making it remarkably easy to charge, no need for separate chargers. Just ninety minutes can give you a whole day of light on the low setting. When the battery needs recharging the flare will switch to low power mode, this is a slow flash on the lowest brightest setting and will give you thirty minutes of light before switching off.
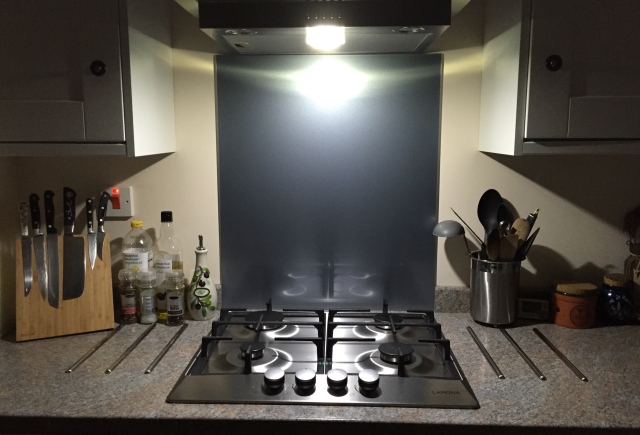
The white front flare gives off enough illumination that it can easily light up a small room, as seen in the picture below of my kitchen, the only light source is the Flare magnetically attached to the metal cooker hood. Whilst I haven’t been camping since a child I can see that this would make an excellent tent light or for other activities such as fell walking where an all round light is required. The magnetic mounting system also means that you can easily attach it to fabric by putting the magnet one side and the flare the other.
Kitchen Illuminated only by the Orfos Flare on full
Overall they are an exceptional set of lights, they are expensive but worth it, especially when you think of the all round visibility they give you (please do take a look at the two videos above to see the lights in action). I deliberately took the photos and videos from the side to show the level of visibility, how many other lights have you seen that can do that?
I am extremely happy with them and would recommend them every time.
Hopefully this review has made you think about your lighting needs now that the nights (in the UK at least) are getting longer. Please be safe and be seen.
* Lumen – is the SI unit of measurement for the brightness of luminous flux (light) which is roughly equivalent to the amount of light/strength of a single candle flame.
** Weight – Figures stated are my measurements, manufacture website states 90g
UPDATE – 16th October 2015
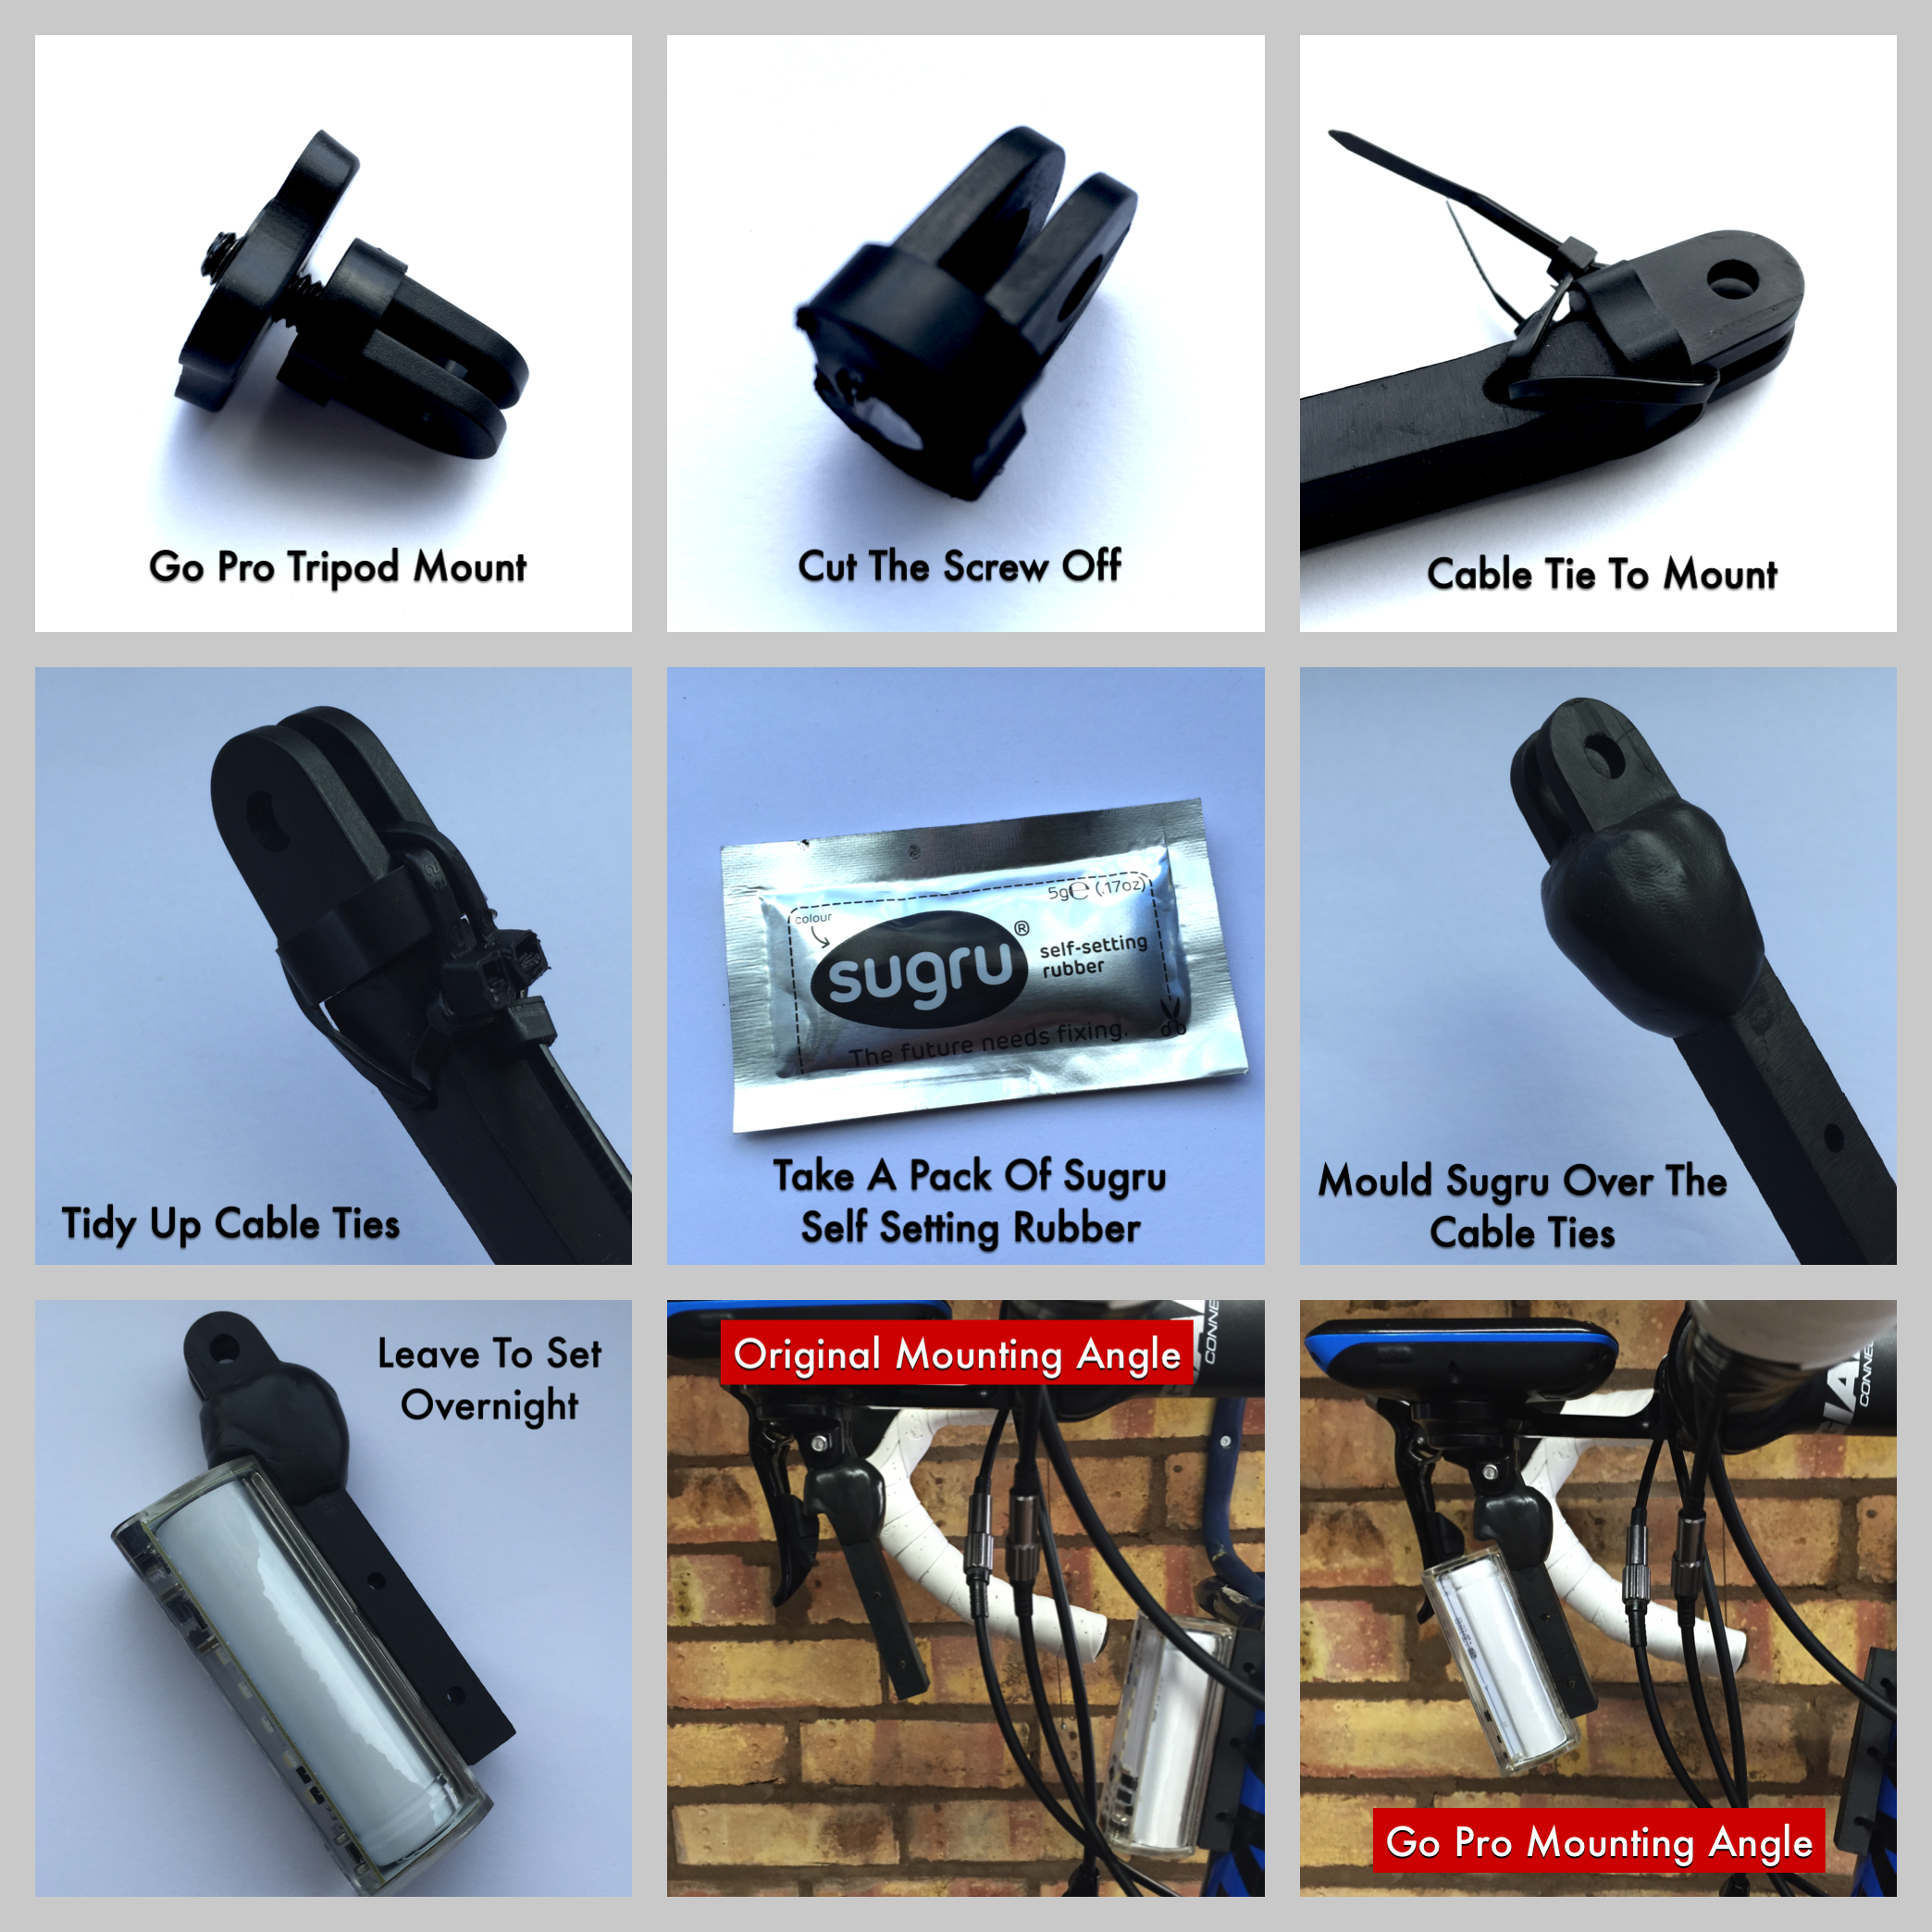
I made the new mount for the front flare by joining a go pro tripod adapter to the top of the supplied Orfos magnet with cable ties and Sugru to make a secure and durable connection. It withstands vibrations whilst out on the road and is strong enough that you can still pull the flare off the magnet. Total cost of the mount about £4 in parts and 30 minutes to put to together.
Sugru / Go Pro Mount
UPDATE 2nd March 2016
Following up on a comment from Rob, the video below shows the rear flare on pulse in the daylight. It is difficult to get an accurate representation of the light during the day as the camera exposure settings make the flare look dimmer than it actually is.
To further help gauge the brightest of the flare during the day, the video below is a selection of common rear lights (all with new batteries) from left to right Cateye TL-LD130/150, Camden Gear XML T-6, Orfos Flare, Lezyne Femto and Cateye TL-LD260