I once thought about cycling to work, this would have been sometime around 2009 and before my heart attack, I was living close to Heathrow airport and working in Central London approximately 20 – 25 miles away.
The thought occurred to me on one of my morning commutes – a short drive of about 2 miles to Hatton Cross tube station, park the car, jump on the Piccadilly line tube to Hammersmith, walk to the Hammersmith and City Line (just enough time for a Starbucks Double Tall Latte and cigarette) for another tube ride into Central London (going home was the reverse including yet another visit to Starbucks) – the thought lasted the time it took me to park the car and walk into the tube station. It consisted of the following points:
- I live too far away, so it isn’t really an option, what are you thinking
- The roads in London are far too busy and dangerous to cycle on
- I’ll get all hot and sweaty, there’s no showers at work
- Not enough time, I’ll be late.
- It’s cold this morning, imagine cycling in this…
Thought dismissed as completely impracticable, although with hindsight they aren’t valid reasons not to cycle to work and are just excuses, the lot of them…..
Fast forward five years, post heart attack, it’s now 2014 and I’m still working in Central London once or twice a week, but now I’m living 120 miles away in Worcestershire. By this time I had been cycling for three years, fully addicted to it and looking at increasing my time in the saddle. Then I got an email at work saying that the company had signed up to the Cycle To Work Scheme, the website had a big banner with “Save up to 42% on a new bike!” emblazoned across it. It’s wasn’t long before that lost thought from 2009 resurfaced, You could cycle to work? After all you always need a new bike – except this time I really did live too far away.
As a cyclist and recovered heart patient, I took the time to find the solutions to all of the excuses on my list and started cycling to work. If I can find a solution living 120 miles away from my place of work, I’m sure you can to. You don’t need to be cycling in everyday of the week, twice a week will bring the health benefits – try it you might actually enjoy it and end up a regular commuting cyclist.
Life’s too short for regrets and if onlys, but if I did make a list of them dismissing that cycle to work thought in 2009 would certainly be towards the top – just take a minute to think about the health benefits 30 to 45 minutes of cycling a day would have made to my fitness and health, would I have had a heart attack at the age of 38?
As the saying goes – “Where there’s a will there’s a way” – if you really want to do something you will find the time and the means to do it.
Solutions to the Excuses: –
1 – I live too far away?
Having moved to the Midlands my journey to work was slightly different now, but it still consisted of a short drive to a train station and tube journey across London.
Cycling the entire distance was obviously completely impracticable and out of the question, but I could ride to and from the stations removing the car and tube from my journey.
That was distance resolved, although it presented another problem with bikes on the train. My normal train would only take a few bikes and it was generally full each day, I ran the risk of getting to the station and not being able to get the bike in the carriage. I had seen other commuters carrying folding bikes onto the train and their small sixteen inch wheels are a regular sight on the streets of London. I’ve always been fascinated by the Brompton bicycle, especially watching other commuters folding them in seconds from a full bike to small neat square package.
Decision made I got myself a Brompton on the cycle to work scheme.

I can already hear the excuses starting – “That’s fine for you, I don’t travel by train to work, I have to drive in” – Well, I’ve thought about this one too and have a solution. In fact, I even used it myself for six months. The trains into London were getting expensive, I found it much cheaper (and surprisingly quicker somedays) to drive into London, park outside the congestion zone and cycle the last 3 miles to the office. Admittedly the Brompton does make it easier to get a bike into the boot of a car.
If you are serious about wanting to cycle to work (you’ve read this far, so I take it you are) look at your current journey, could you park 3 to 5 miles away from work and cycle the last little bit? As you get stronger and fitter you can start parking further away and cycle more of it, you might even end up cycling the entire distance. You will also find that you start saving money, the further out of town you go the cheaper the parking charges will be and you will also be using less fuel.
2. City roads are too busy to cycle on.
Once you take the plunge you’ll find it’s not that much different than anywhere else you ride, but the key is to find the quieter roads, cycle paths and lanes.
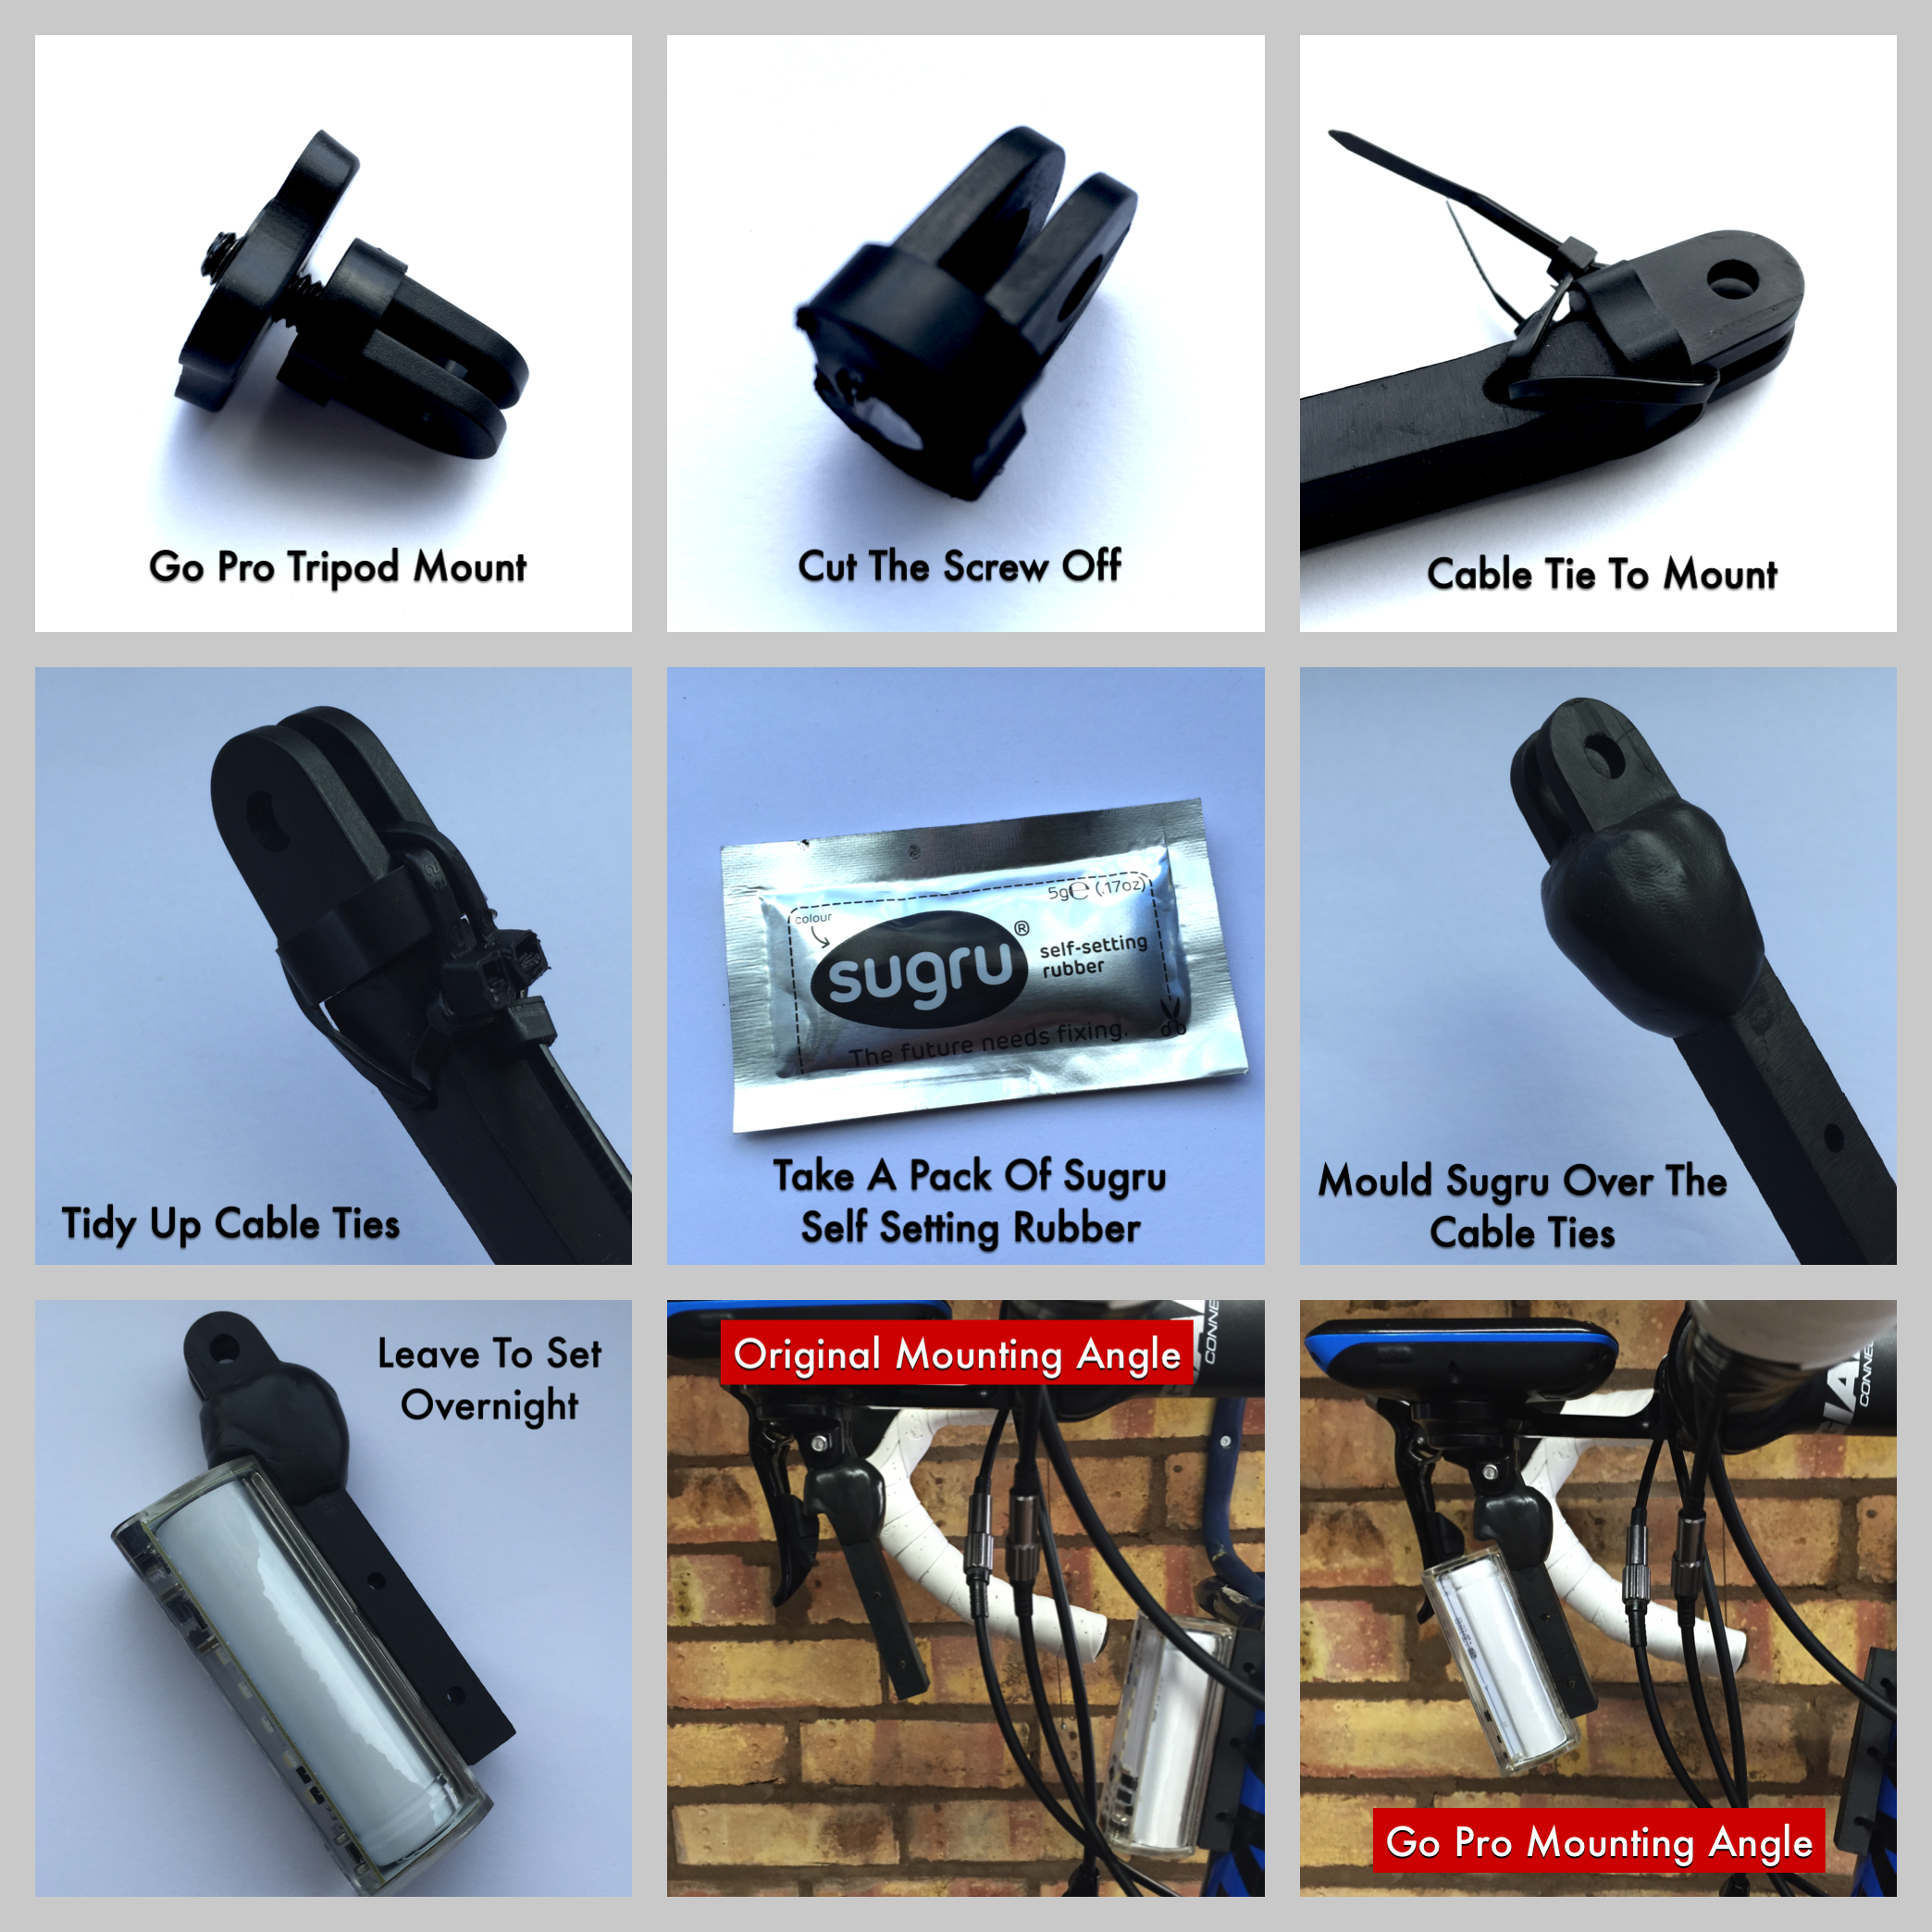
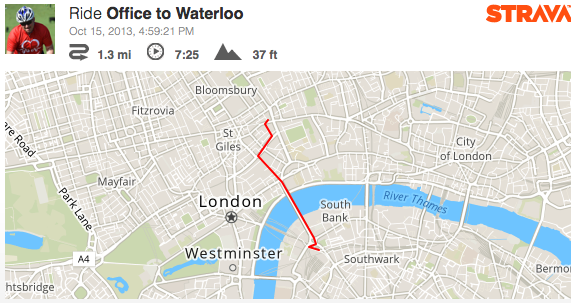
Take Oxford Street as an example, it’s packed with buses, taxi’s, pedestrians and set after set of traffic lights. It was the most direct for me so I’ve cycled it many times and it’s certainly doable, although you do need your wits about you. If you take the roads that run parallel to it, you will find there’s much less traffic making it so much easier. As you can see from the two Strava rides below, the quieter roads extended my commute by less than a quarter of a mile and just over a minute.


If you don’t know the area that well, take a look at a map from Ordnance Survey, check the route on a day off to make sure it’s suitable – you don’t want to find yourself cycling down a muddy bridleway on your way to work, coming home is a different story!

3. I’ll get all hot and sweaty, there’s no showers at work
The key here is to cycle at a slower pace, after all you are commuting to work and not racing for that PB (Personal Best) or KOM (King Of the Mountain) on a Strava segment. Easing off the pace will still increase your heart rate and be beneficial to your health, you just don’t build up a sweat. Take advantage of the time, it’s less stressful than driving and gives you time to clear your thoughts before you get to work, take the time and enjoy the ride.
Plan your week in advance, carry a change of clothes with you or perhaps drive to work on Monday with your clothes for the week, cycle Tuesday to Thursday and then drive back in on the Friday to collect your kit. If you do carry your clothes try to avoid a rucksack on your back and opt for a bike that can carry your bag for you. Doing so stops you getting hot and sweaty behind the rucksack.
You could also try products such as Muc-Off’s Dry Shower that you can use to freshen up when you get to work if you can’t get a shower, you’ll smell of coconut for the day, but that is preferable to the alternative.
Speak to your colleagues and employer, if you can sell the benefits of cycling to work you might be able to convince them to install a shower. If they have signed up to a Cycle to Work scheme they probably already know the benefits a cycling workforce will bring them and may have already thought of adding showers. They might just need someone to show them there’s an actual need for them to do it.
4. Not enough time – I’ll be late
In my case, this just wasn’t an issue. It was actually quicker for me to cycle the 3 miles through Central London than to take public transport.
One afternoon a colleague said that he could get from the office in Holborn to London Waterloo train station before me by taking the bus. Unfortunately it was a day that I didn’t have my bike with me, not a problem I said I’ll use a Boris Bike instead (a public hire scheme for bikes in London introduced by the Mayor Boris Johnson). I was a member of the scheme and had my access token with me – challenge accepted! We both left the office by the main entrance at exactly the same time, he headed off in the direction of the 521 bus whilst I walked to the nearest Boris Bike dock in a road behind the office.
I didn’t do anything differently from normal and seven and a half minutes later I was docking my bike at Waterloo and texting my colleague to say I’ve arrived – I quickly got a text back saying that he was just about to cross the Thames and that he couldn’t believe I was already at the station. An easy win for me and the bike.
You will find taking the quieter side roads and cycle paths will avoid most of the rush hour traffic, if you do come across queuing traffic you can normally easily pass it on a bike anyway.
Having said that, you may find that it does take a little longer by bike, if it does the easy answer to this is to get up earlier! You will better for it in the long run.
5. It’s cold this morning, imagine cycling in this…
I’ve cycled in almost every type of weather there is, snow, rain, hail, sun, wind and even -3 degrees celsius at 3am in the morning on an overnight 100 mile charity cycle ride. I can say with confidence that there’s no such thing as the wrong type of weather, just the wrong type of clothing.

Investing in various types of clothing is money well spent. The real tip is to wear layers, get a decent baselayer that will keep you warm and then add layers depending on what the weather is doing that day, such as a waterproof jacket if it’s raining.
A cycling adage springs to mind – dress for the ride and not the car park – by that I mean think about what the weather is going to be like once you’ve warmed up and into the ride itself, wrapping up at the start might make you far too hot later on.
I now love riding in the colder weather, it’s amazing how soon you warm up once you start exercising. If you’re still cold, you’re not pedalling hard enough!
Now let me ask that first question again, What’s your excuse not to cycle to work? Tell me in the comments below or on Twitter and I’ll find a solution to it for you!